参考文章:
背景
随着代码量的日益增加,以及团队的扩大,代码的质量需要有一定的保证,再加上目前有些功能需要oem给客户使用,一些KA用户会要求提供一些代码分析报告,所以本文将总结一下如何搭建iOS静态代码分析系统
本文涉及的工具及平台:
大部分iOS平台静态分析基本是基于开源的oclint进行的,本文虽然使用sonarqube,但免费的分析方案核心仍然是oclint
sonarqube是一个开源的静态代码分析平台,提供免费的社区版,免费的社区版不支持oc,但github有提供开源的插件,可以支持OC代码分析,付费的社区版plus有支持oc的分析插件SonarCFamily for C
无论免费方案还是付费方案,首先都是基于xcodebuid过程中的日志来进行的,下面总结下两种方案配置流程:
xcodebuild
iOS核心工具,安装好Xcode就会自带此工具,因为oclint分析的核心是xcodebuild在编译app过程中的log,所以需要xcodebuild(build失败也会对已经build的日志进行分析,但尽量保证可以build成功)
如果项目是在workspace中需要指定-workspace和对应的scheme,可以通过xcodebuild -list查看
我们并不需要打出的包可以安装到手机上,只是需要build过程中的日志而已,所以我们只需要打出模拟器包Debug便可
|
|
因为xcodebuild会有缓存,所以我们每次执行前需要clean
|
|
能编译成功的话就可以进入下一步了
sonarqube
sonarqube是一个提供代码静态分析的平台,提供了一套完整的静态分析方案,包括后端及前端页面,可以结合jenkins、gitlab等平台来进行代码分析。
因为其底层源码为java开发的,所以对java代码支持比较完善,但是免费的社区版并不支持OC,所以我们如果要借助此平台的话,有以下两种方式:
- 开源插件sonar-object-c
github上开源的插件,目前作者已经停止迭代,上面是找了好久找到的能兼容sonarqube7.9的版本 ,核心是使用oclint检查,目前只有70+规则,但是可以自定义规则
- 付费使用社区版plus,提供了
SonarCFamily for C插件- 有官方提供技术支持,
250+的rules可供选择,不可自定义规则
- 有官方提供技术支持,
安装sonar-services
无论使用上面哪种方案,首先要将服务搭建好服务,搭建服务有两种方式
下面主要总结使用安装包的配置流程:
安装包下载完成后,执行sonarqube-7.9.1/bin/macosx-universal-64/sonar.sh start,此时http://localhost:9000/应该已经可以访问了,默认账号为admin密码为admin,如果启动失败可以去sonarqube-7.9.1/logs下查看日志
启动成功后我们在最下面会看到warning

建议我们自己配置数据库,下面我们就来配置数据库(mysql后续将不再支持):这里我们使用的是PostgreSQL,配置参考
|
|
数据库安装好后,我们需要提供一个数据库和账号供sonarqube使用
|
|
然后我们去sonarqube-7.9.1/conf目录下编辑sonar.properties,将数据库相应配置配置完成
|
|
编辑完成后执行sonarqube-7.9.1/bin/macosx-universal-64/sonar.sh restart,此时警告已经消除了
至此我们的sonarqube的前端服务已经配置完成了
以下是配置过程中可能遇到的问题:
java.security.AccessControlException: access denied- java版本问题不支持高版本13,(使用
docker就没这个问题)
- java版本问题不支持高版本13,(使用
Sonarqube will not start due to elasticsearch being unable to write yml settings fileelasticsearch不支持root用户启动,ls -la检查报错文件夹是否归属为root,如果为root就使用修改所属用户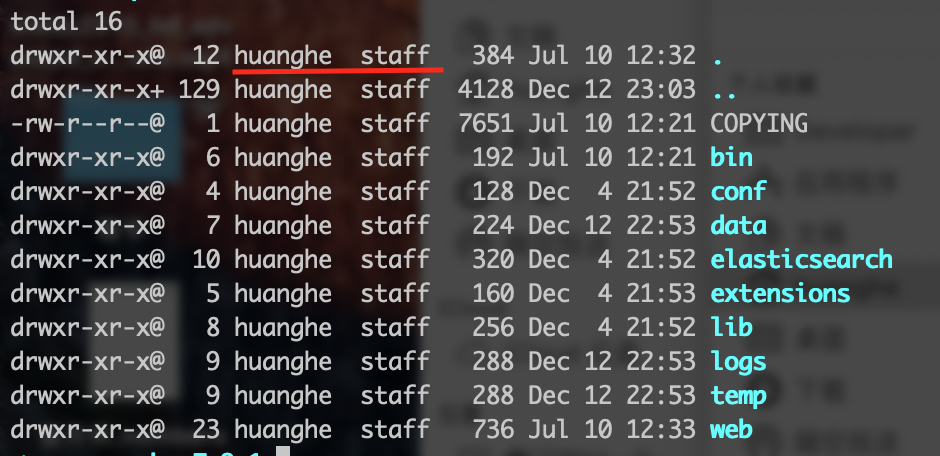
mysql连接失败(换个数据库吧)

下载sonar-scanner
- 下载sonar-scanner for cli

- 将
sonascanner添加至环境变量export PATH=$PATH:/path/to/scanner/(建议将此命令放到配置环境里,保证每个终端都包含此环境变量)
开源方案
对于使用开源方案来说,本质流程如下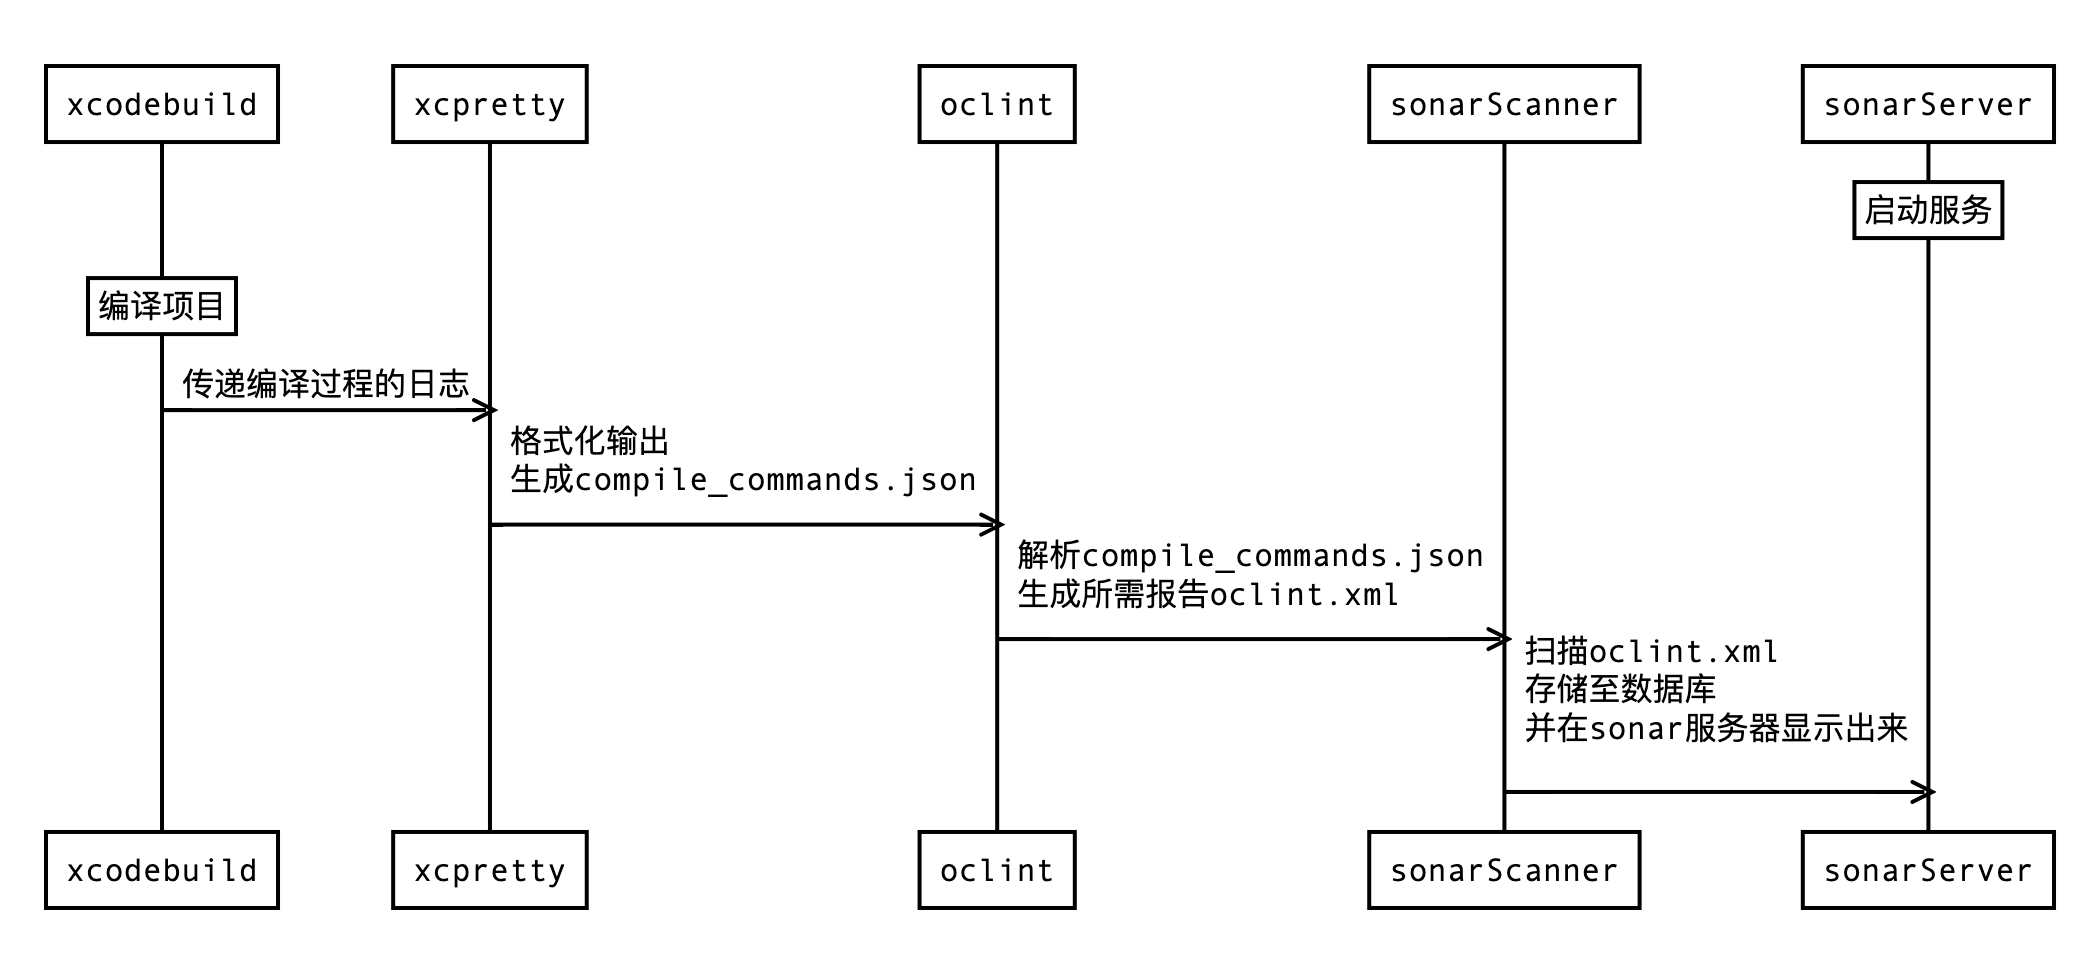
xcpretty
xcpretty is a fast and flexible formatter for xcodebuild. It does one thing, and it should do it well.
xcpretty是一个格式化xcodebuild输出的工具,安装
-r, --report 指定生成的报告格式可选为junit, html, json-compilation-database
-o, --output指定生成的文件名称
这里我们使用json-compilation-database格式,输出文件名为compile_commands.json
(注意输出名称不能更改,否则后面oclint会报错,因为oclint源码中内置了校验名称,此处便是写死的解析文件名称的代码)
OClint
OCLint is a static code analysis tool for improving quality and reducing defects by inspecting C, C++ and Objective-C code
OClint是进行OC代码分析的核心工具,主要对上一步生成的compile_commands.json进行分析,生成报告
其中我们主要使用oclint-json-compilation-database,Github源码
oclint-json-compilation-database支持指定校验文件夹和过滤指定文件夹,本质上最终执行oclint -p命令,可以通过附加-v查看,同时还支持使用--后面跟上oclint执行参数
oclint的-rc选项可以自定义校验的参数值,如
当我们需要自定义多个oclint参数时,我们可以将配置写在.oclint文件中
|
|
以下是所有支持的Rule,可以通过 -list-enabled-rules x查看
|
|
最终我们将.oclint放在与compile_commands.json相同的路径下,并在该路径下执行
最终会生成oclint.xml(可以自己生成html格式,查看效果)
开源插件sonar-object-c
- 下载jar包到
sonarqube-7.9.1/extensions/plugins,然后重启服务器 - 下载sonar-scanner for cli
- 将
sonascanner添加至环境变量export PATH=$PATH:/path/to/scanner/(建议将此命令放到配置环境里,保证每个终端都包含此环境变量)
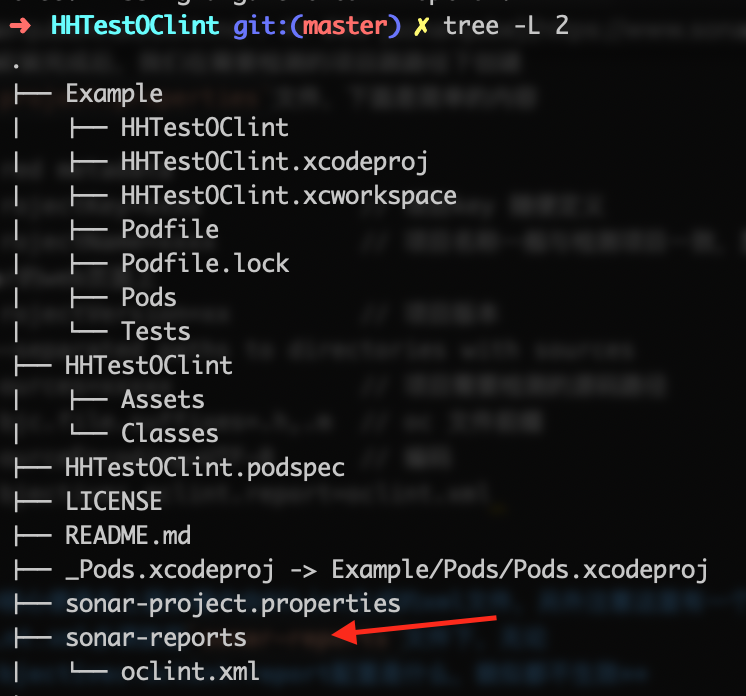
上述配置安装完成后,我们在需要检测的项目跟路径下创建sonar-project.properties文件,下面是简单的内容
这里的核心便是在上面步骤中由OCLint生成的xml文件,另外注意这里有一个坑,oclint.xml必须放至sonar-reports文件下,无论sonar.objectivec.oclint.report配置是什么,貌似都不生效
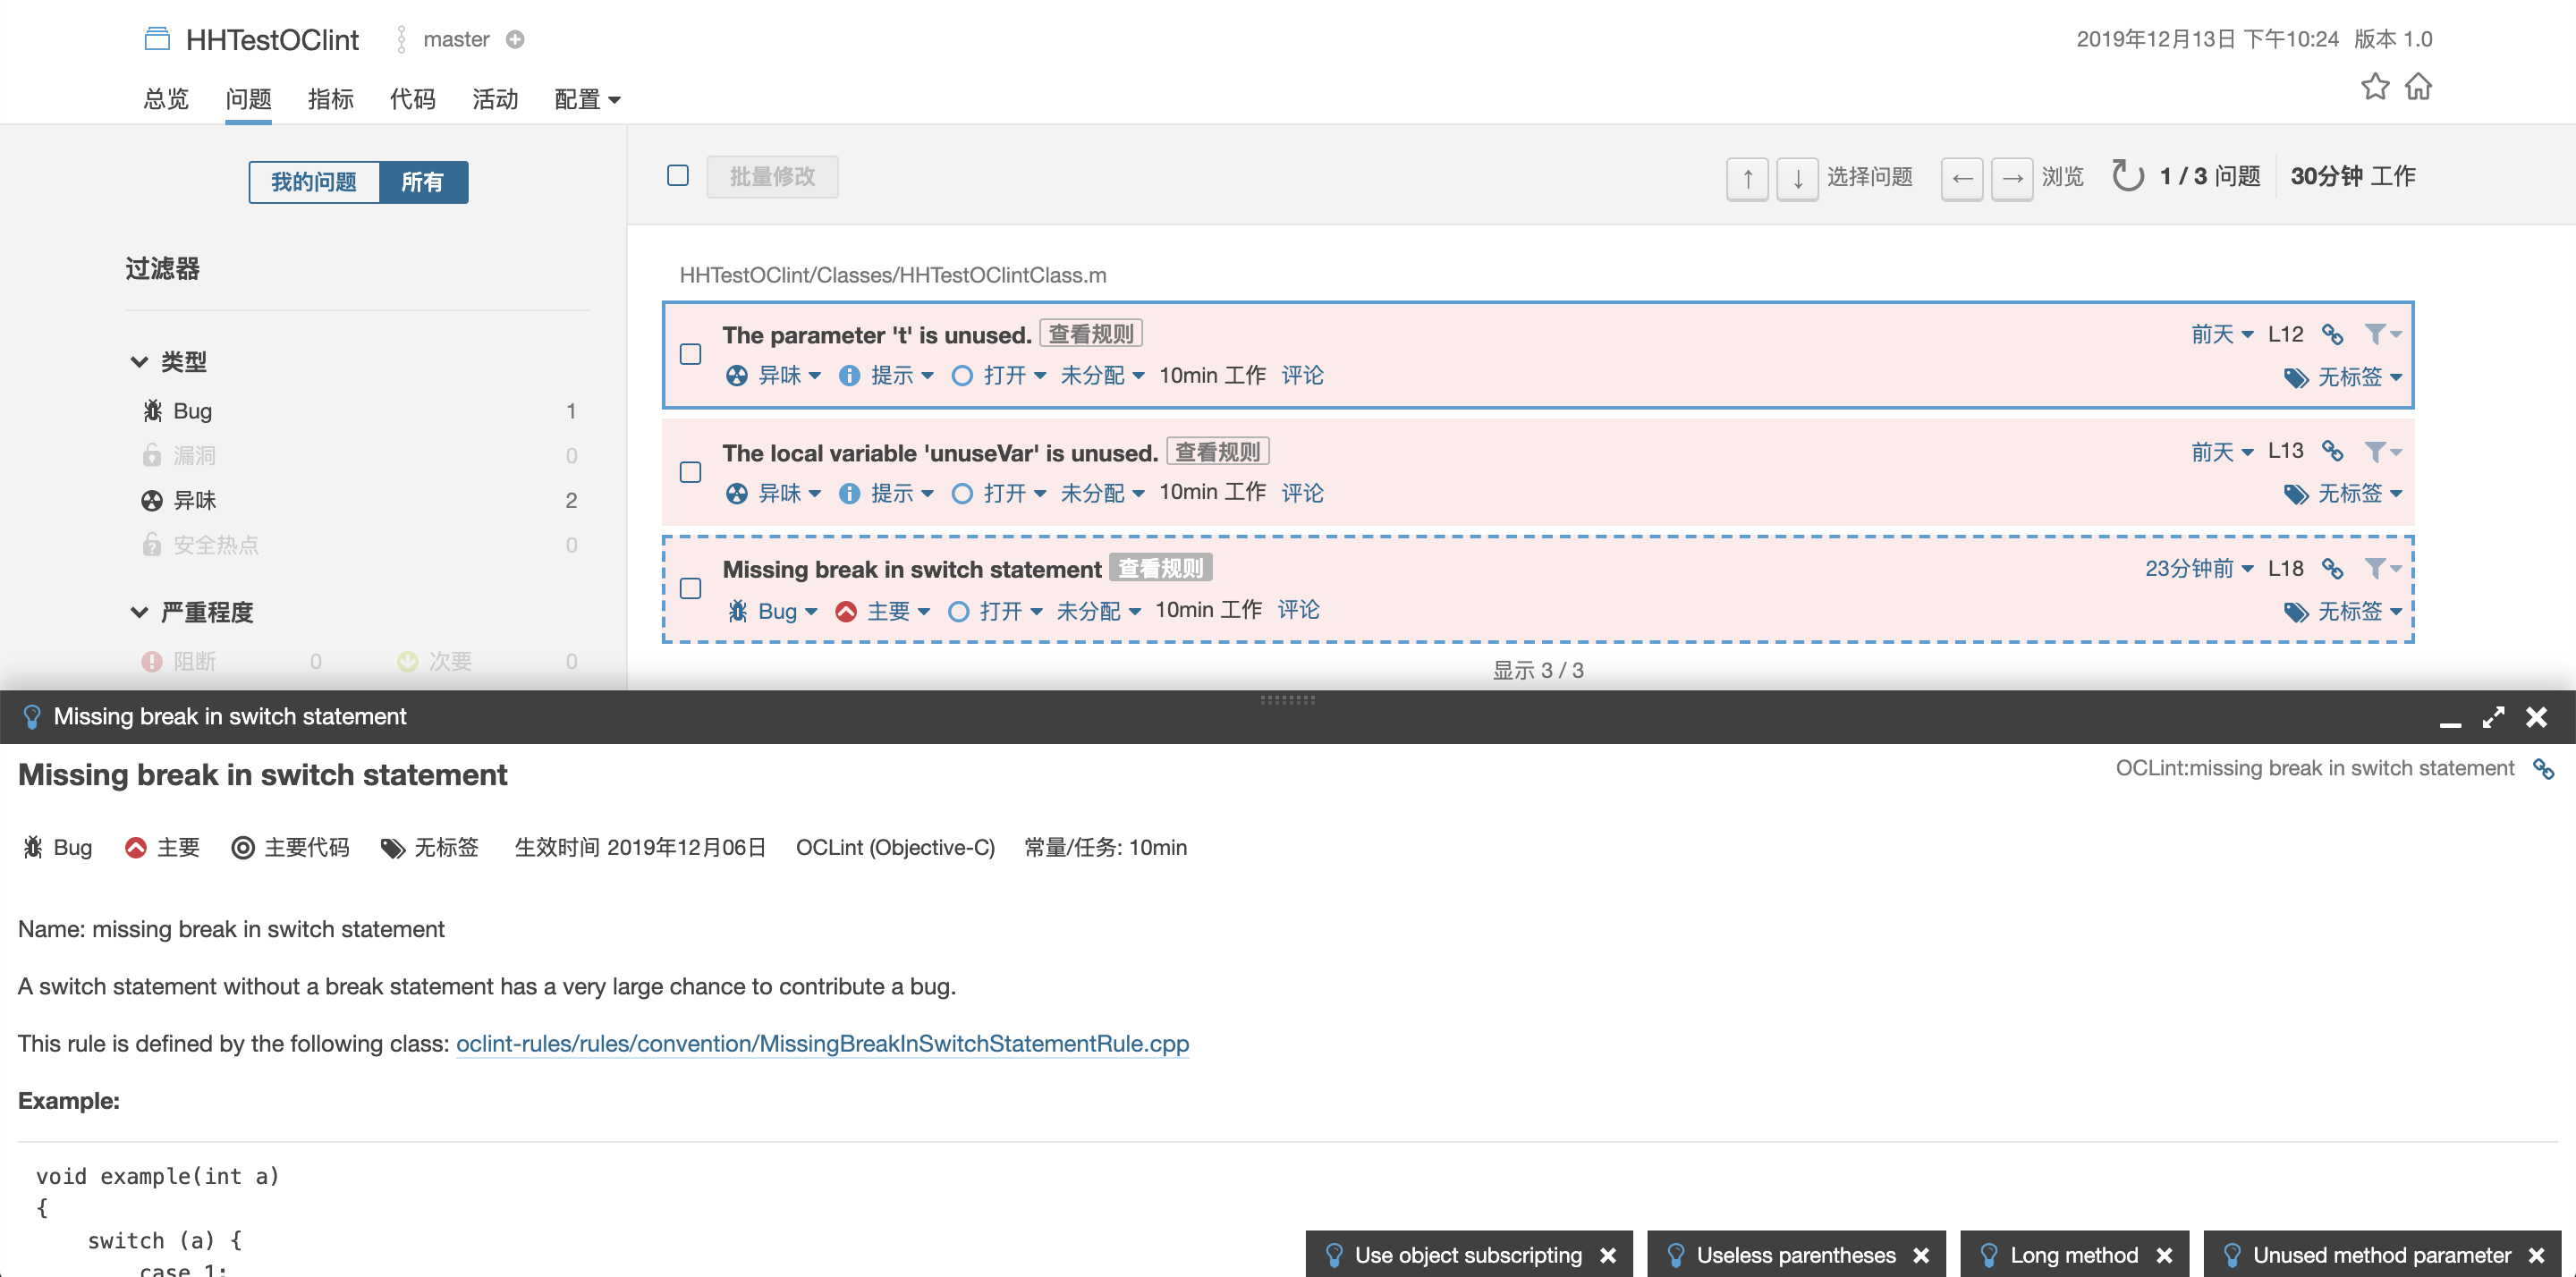
创建完成后,在sonar-project.properties路径下执行sonar-scanner,执行成功后,便可在sonar的前端页面看到对应的检测效果了

点击对应结果,可以查看详细信息,如果我们想过滤某些规则,或者自定义一些规则的取值,可以使用上面介绍的.oclint文件进行自定义配置
付费方案
build-wrapper
build-wrapper是sonarqube开发的一个日志分析工具,只有部署了付费版的服务才可以下载,下载路径为{SonarQube URL}/static/cpp/build-wrapper-macosx-x86.zip
付费插件SonarCFamily for C
- 申请试用社区版plus,获取试用序列号
- 登录
admin,点击Administrator-> My Account -> Security,生成Tokens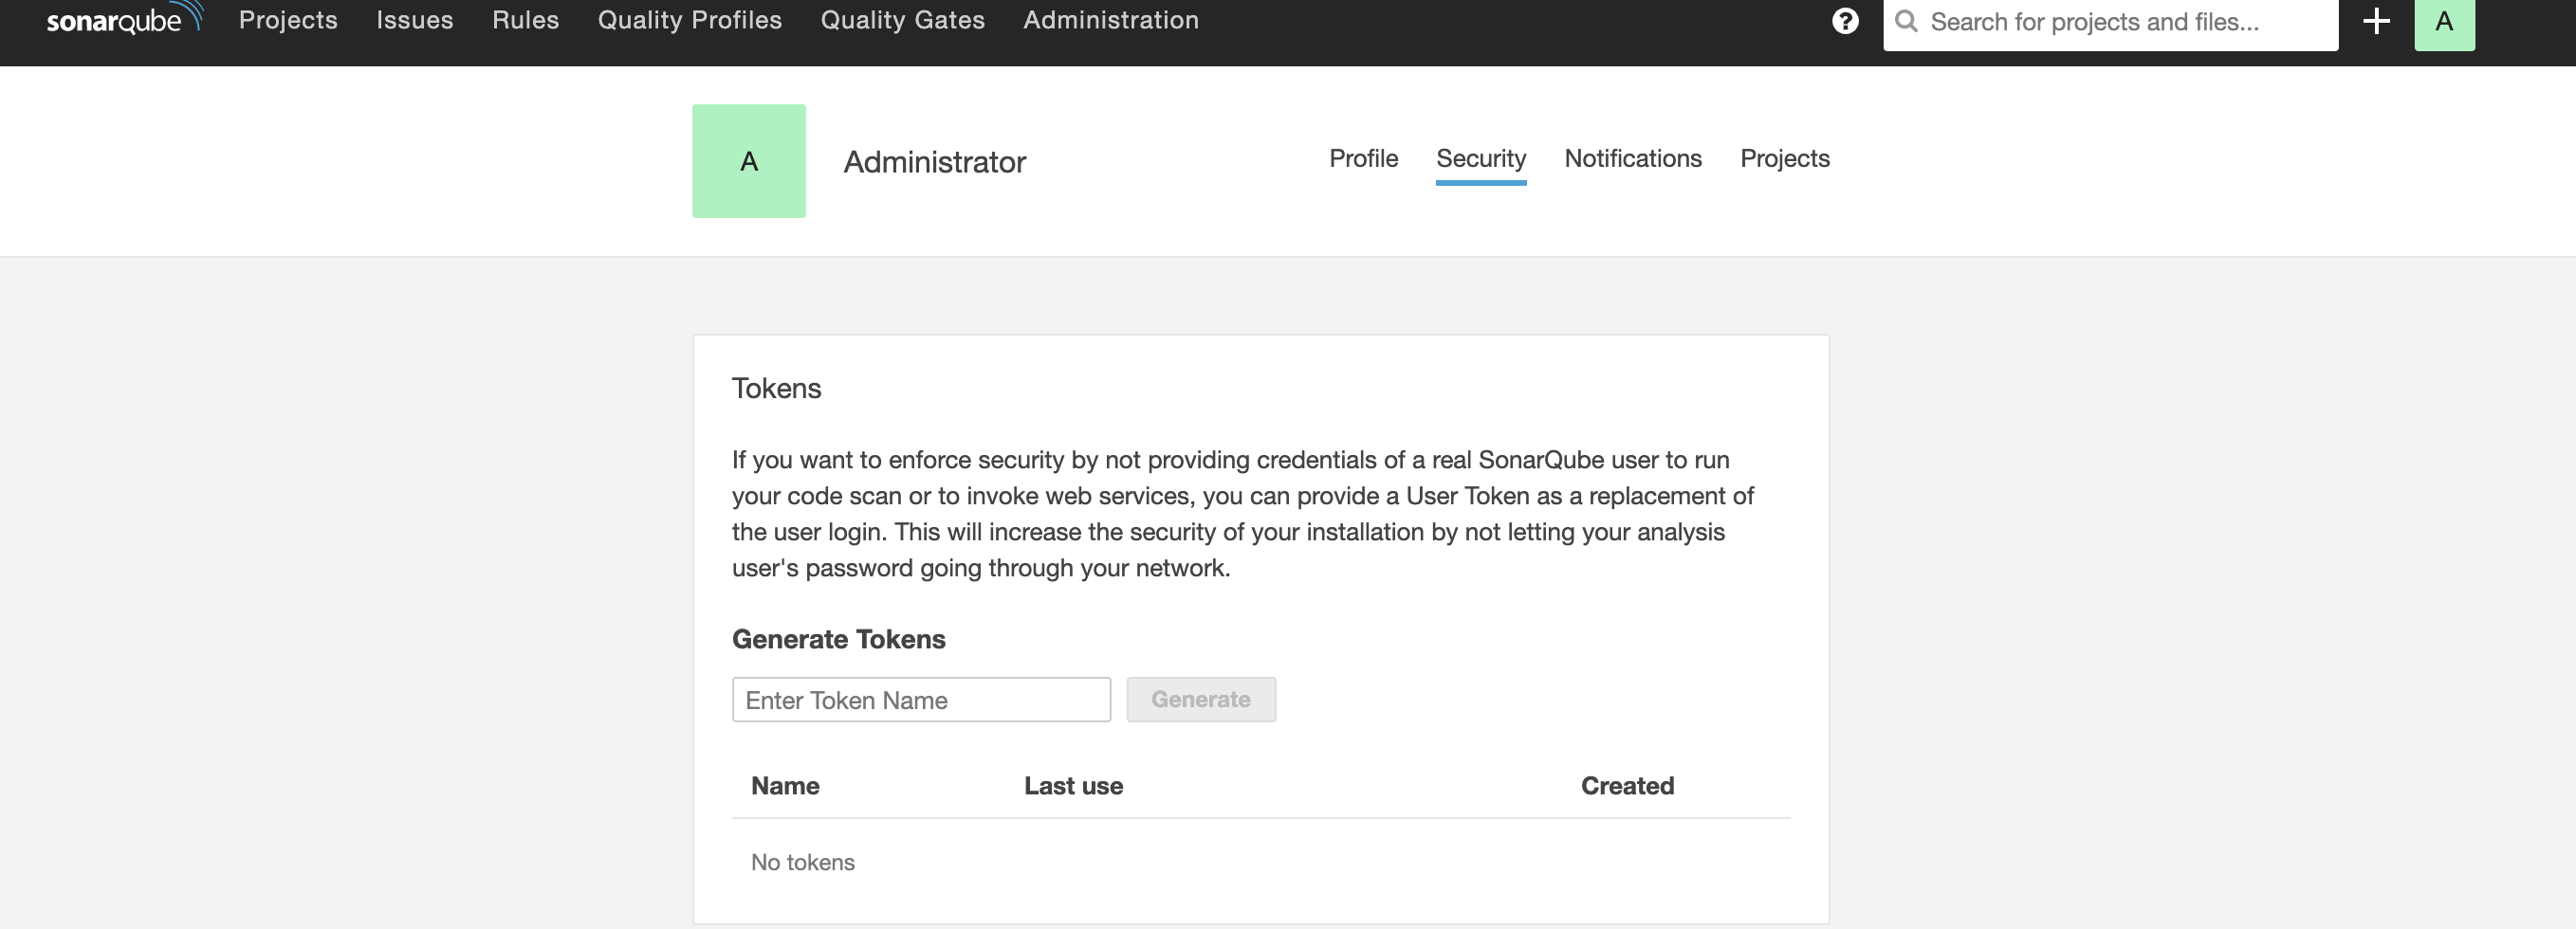
上述配置安装完成后,我们在需要检测的项目跟路径下创建sonar-project.properties文件,下面是简单的内容
详细参考开源项目objc-llvm
创建完成后,在根目录下执行
我们可以看到,付费版仍然需要xcodebuild,至于build-wrapper应该是sonarqube官方开发的类似于oclint的分析工具。
区别
下面我们对比下开源版本和付费版本的区别:
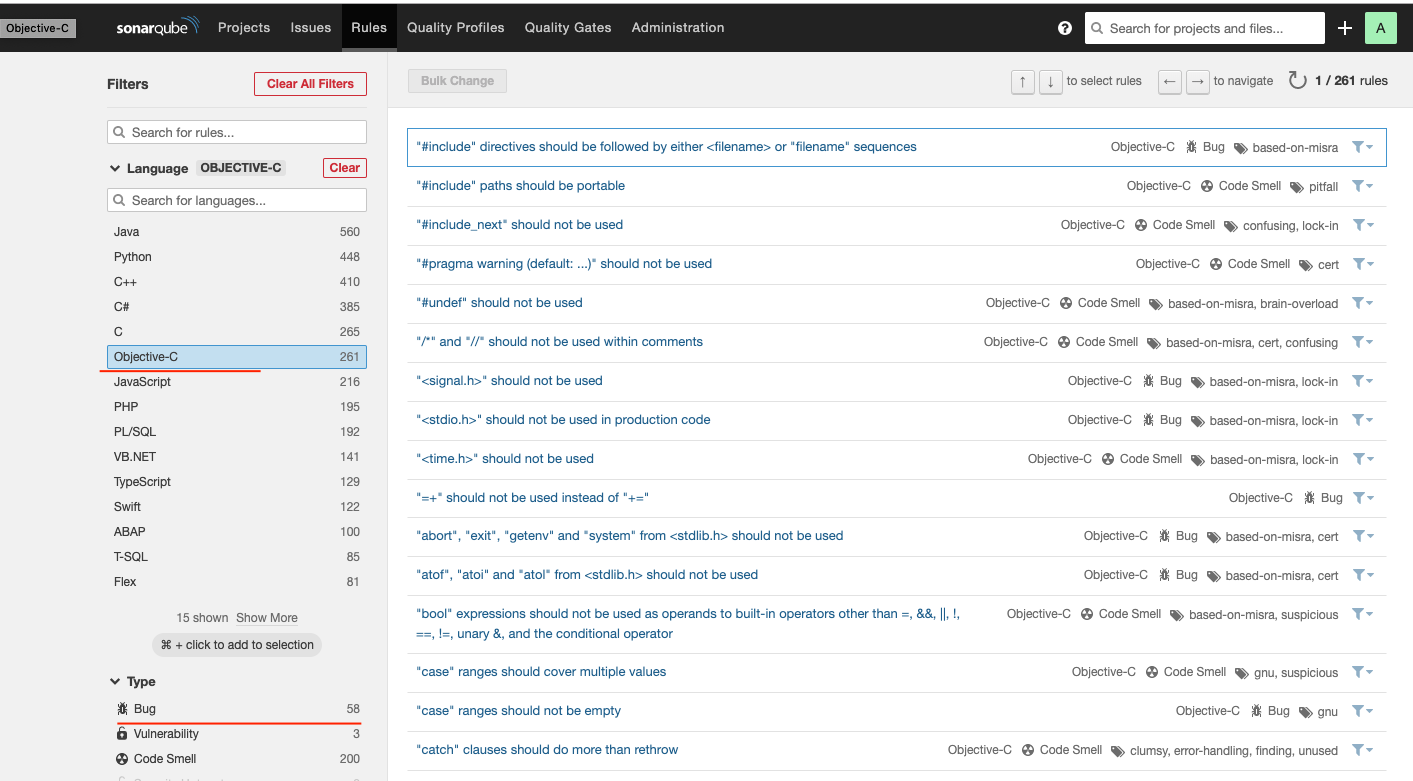
- 规则
- 付费版有261个规则,其中bug类58个
- 开源版有77个规则,其中bug类12个

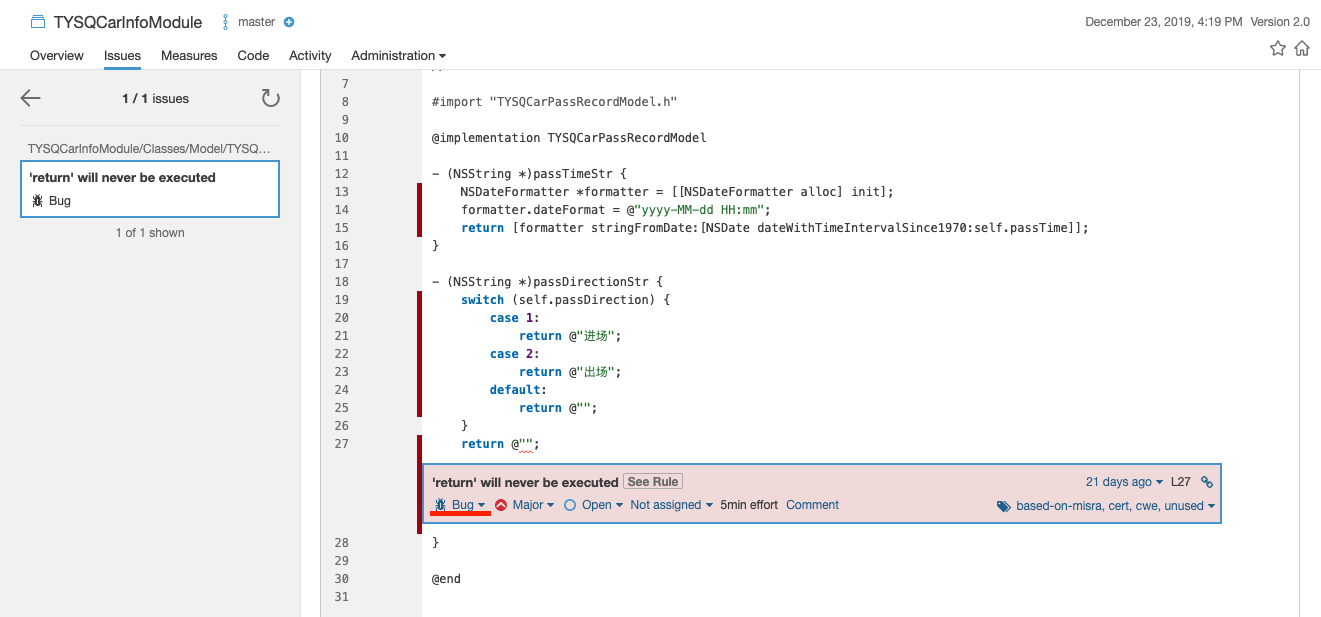
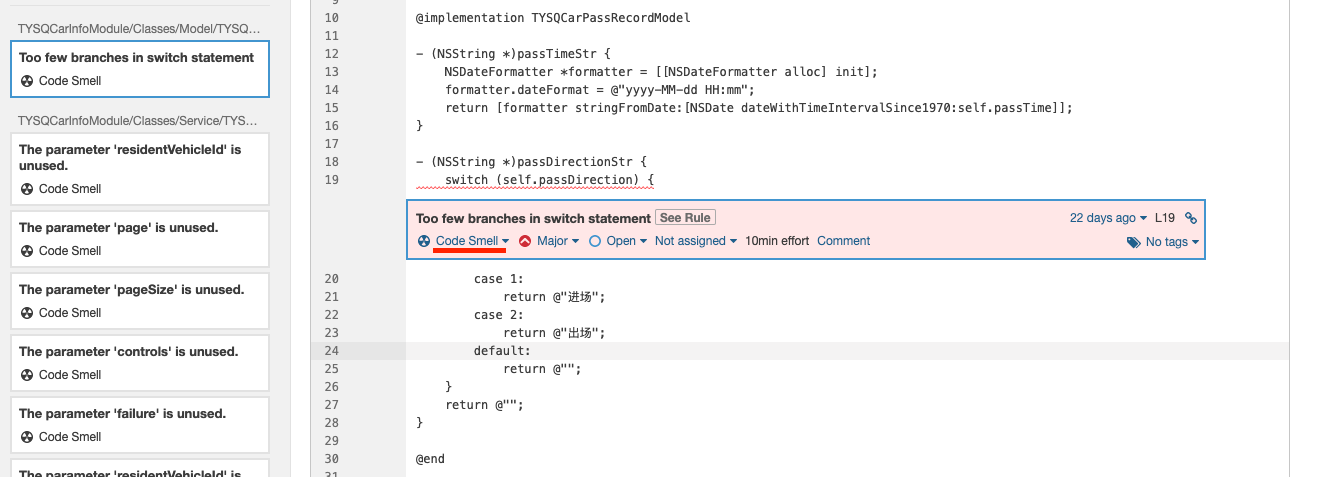
相同代码不同处理规则
- 同样的代码付费版本认为是bug
- 开源版本判定为Code Smell
成本
- 开源方案免费,但规则需自己使用c++开发
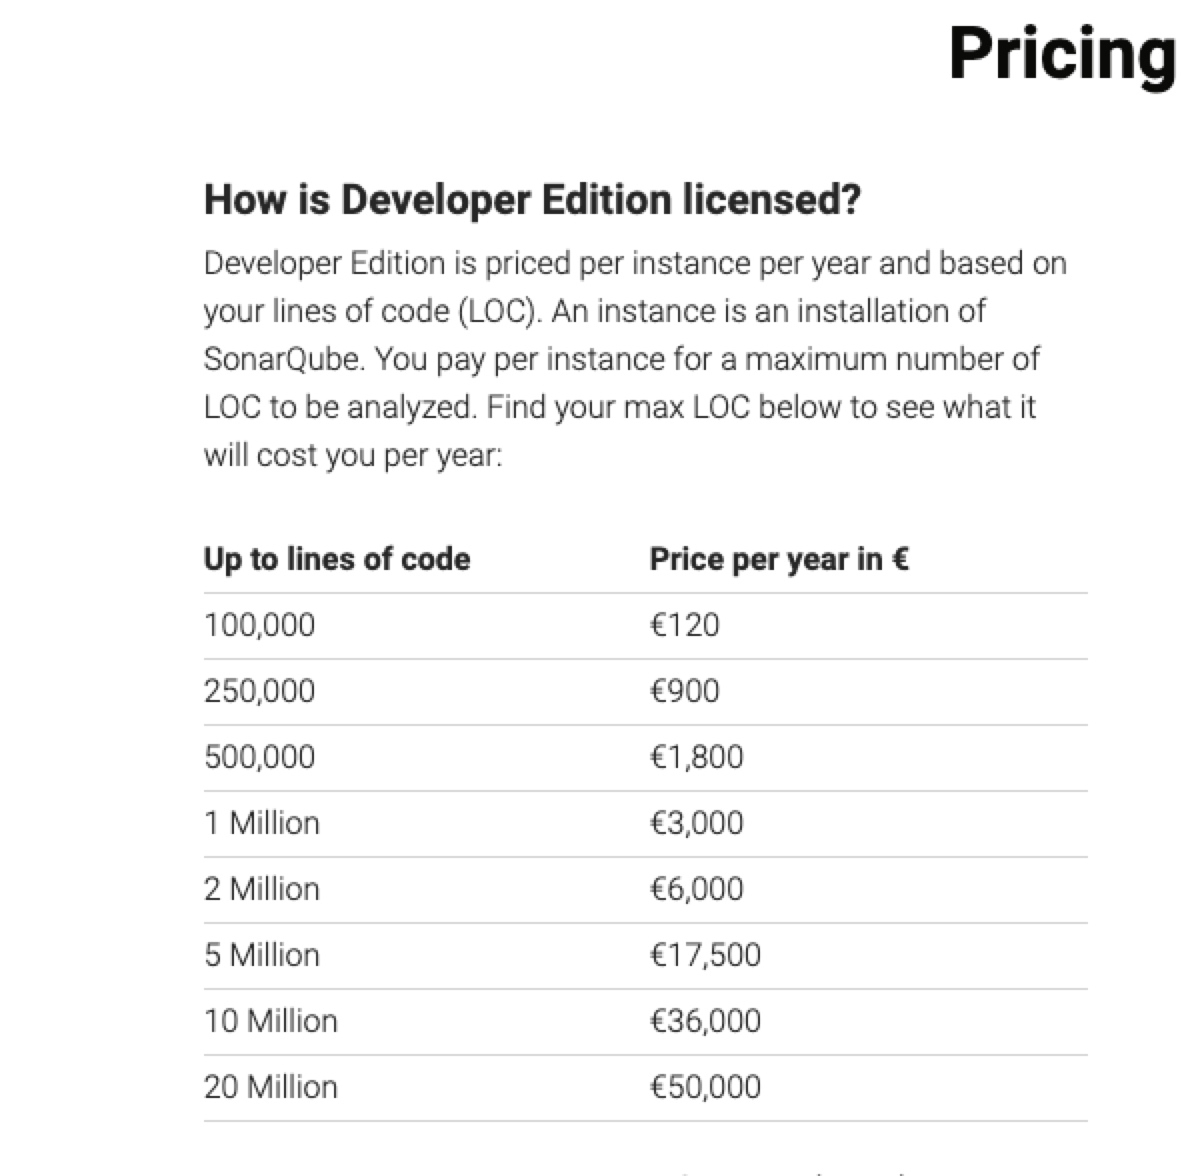
- 付费方案按不同代码规模有不同计价方式
总结
从上面可以看出,开源方案其实核心就是oclint,只是借助了sonarqube提供的前端服务而已,所以如果有自定义需求,可以考虑自己搭建服务。而付费方案则是sonarqube官方提供了一系列判定规则,可能更契合代码规范,但是不能支持自定义
虽然oclint提供的rule只有70+,还有一些是不适用oc的,但可以支持自定义规则,可定制性很高,所以如果不打算使用付费版的话,可以考虑自行定制规则。